User authentication is a crucial aspect of modern mobile applications, ensuring that only authorized users can access specific features and data. Firebase Authentication provides a robust solution for implementing user authentication in Flutter applications seamlessly. In this comprehensive guide, we’ll explore how to integrate Firebase Authentication into your Flutter app, enabling secure and streamlined user management.
Why Firebase Authentication?
Firebase Authentication offers several advantages for Flutter developers:
- Easy Integration: Firebase provides Flutter-friendly plugins that simplify the integration process, allowing developers to focus on building features rather than managing authentication infrastructure.
- Secure Authentication Methods: Firebase supports various authentication methods, including email/password, phone number, social media logins (e.g., Google, Facebook, Twitter), and third-party providers (e.g., OAuth).
- Scalability: Firebase Authentication scales effortlessly to accommodate growing user bases, ensuring consistent performance even under high loads.
- Built-in Security: Firebase handles authentication-related security concerns, such as password hashing, brute-force protection, and account recovery, reducing the burden on developers.
- Cross-platform Compatibility: Firebase Authentication works seamlessly across multiple platforms, including iOS, Android, and web, allowing developers to maintain a consistent user experience across devices.
Integrating Firebase Authentication into Flutter
Follow these steps to integrate Firebase Authentication into your Flutter project:
Step 1: Set up Firebase Project
- Create a new Firebase project or use an existing one via the Firebase Console.
- Add your Flutter app to the Firebase project by following the provided instructions, including adding the
google-services.json(for Android) andGoogleService-Info.plist(for iOS) configuration files to your Flutter project.
Step 2: Add Firebase Authentication Dependency
Add the Firebase Authentication plugin to your pubspec.yaml file:

Run flutter pub get to install the dependency.
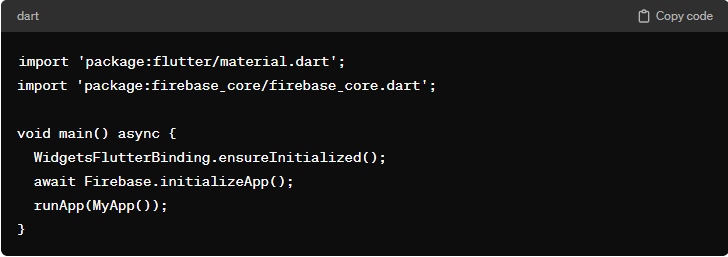
Step 3: Initialize Firebase
Initialize Firebase in your Flutter app by adding the following code to your main.dart file:

Step 4: Implement Authentication
Now, you can implement user authentication using Firebase Authentication methods such as email/password, phone number, or OAuth providers. Below is an example of implementing email/password authentication:

Step 5: Handle User State Changes
Firebase Authentication automatically detects changes in the user’s authentication state. You can utilize this feature to manage user sessions and UI transitions accordingly. For example:

Step 6: Additional Features
Explore additional features offered by Firebase Authentication, such as:
- Account linking
- Custom user claims
- Multi-factor authentication
- User management (e.g., password reset, email verification)
Conclusion
Integrating Firebase Authentication into your Flutter app simplifies the implementation of secure user authentication, allowing you to focus on delivering value to your users. By following the steps outlined in this guide, you can leverage Firebase’s powerful features to build robust and scalable authentication solutions for your Flutter applications.

